Showing posts with label free pattern. Show all posts

Sunday, September 15, 2013

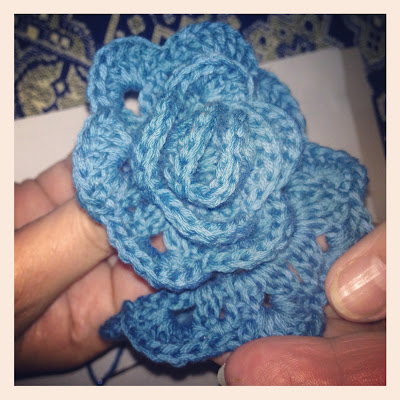
'n Roos borsspeld uit die bosveld

My skoonma en haar sussies het die naweek wat verby is by Oupa gaan kuier in die bosveld.  Hyt 'n terugslag gehad en almal is toe daarheen om te kyk of hul kan help of bystaan.  Die drie sussies hekel 'n hond uit 'n bos uit!  Daar het hul die roos patroon vir ons neergeskryf in afrikaans (vir die van jul wat afrikaanse patrone gebruik).

Hul het my gevra om hul patroon met jul te deel.


Daar is natuurlik ander variasies beskikbaar op die net, maar hierdie is hul eie uitgedinkte patroon.

Ry 1:      Hekel 51 kettingsteke, draai om.


Ry 2:      Maak 1 langbeen in 6de kettingsteek en dan 3 kettingsteke.  Maak 1 langbeen in       elke 2de kettingsteek met drie kettingsteke tussen elke langbeen.  Draai om.


Ry 3:      Maak {3ks (ketting steke), 1lb (lang been), 3ks, 2lb, 1ks} alles in die eerste gaatjie.  In die volgende gaatjie, maak {2lb, 3ks, 2lb, 1ks}.  Herhaal tot aan die einde van die ry.  Draai om.


Ry 4:      Hekel 7lb in 1ste ‘3ks’ gaatjie en 1kb in 1ks.  Herhaal tot aan die einde van ry. 


Maak blom deur 51ks gedeelte op te rol en vas te werk sover jy draai. Jy kan ‘n ekstra 5de ry by hekel om ‘n groter/platter blom te maak deur in elke stekie van die 5de ry ‘n kb te hekel.


En siedaar!


Dankie ma Lettie Fischer, tannies Elna Bruwer en Salome van Staden dat ek jul patroon kon gebruik as 'n pos :)

{L}

Friday, August 23, 2013

Anina's Headbands


I crocheted these headbands as a request from my friend Anina.  I got the pattern for the bowband here on cornflowerblue's blog.  I love how it came out, it fits neatly and looks really cute.  Thank you to my student Jolandi for playing model after our science lesson.


This scallop headband I crocheted from this picture on All Things Purdy.  She sells these headbands and the patterns for the headband.

It's a little chunky for my taste, but Jolandi rocks it!
If you would like the pattern or if you would like to buy some headbands, let me know!  

Have a great weekend!

{L}  


Sunday, August 11, 2013

Esmes' crochet blanket and edge patterns

Because I’m usually held busy during the day by my 9month old boy, I decided to post the patterns for Esmes’ blanket and the crochet edging on the blog rather than emailing it.  I’m just afraid I’ll forget someone and I've been getting requests for the pattern in drips and drabs!

I crocheted this edge from a picture I saw on pinterest, so it’s not necessarily the ‘correct’ or ‘best’ way to crochet it, but it came out the way I wanted.  I had to wing it a bit in the third round…I’ll tell you what I did when we get there. 

This will also be the first pattern I type out, so if you are unclear on something please don’t hesitate to ask, or if you have any suggestions, I’m all ears! 

Here we go:

{Basic Rectangular Granny Blanket}

Yarn used:  Elle Pure Gold Double Knit (My favourite)
Colors:  Salmon (4)
                Terracotta (3)
                Rose (2)
                Azzure (blue) (1)
                Amethyst (2)
Hook size:  4mm
Finished blanket notions:  115x105 cm


{After each round you can finish off and start the next round with a new color, or you can complete the blanket in one color.}

Round 1:        (Start your granny rectangle)  Ch16.  In fourth ch from hook {2dc, ch2, 3dc, ch2, 3dc, ch1} corner 1 and 2 made.  {skip two ch, 3dc, ch1}  3 times.  In the last ch work {3dc, ch2, 3dc, ch2, 3dc, ch1} corner 3 and 4 made.  {skip two ch, 3dc, ch1}  3 times.  Ss in top of ch3 space.  Finish off.

Round 2:         Ss your new color in the ch 2 corner space you finished round 1, then work {ch3, 2dc, ch2, 3dc, ch1} then in the next ch2 space work {3dc, ch2, 3dc, ch1}.  In every ch1 space across work {3dc, ch1} and when you get to the third ch2 corner space again work {3dc, 2ch, 3dc, ch1} repeat for the fourth and last ch2 space.  In the next ch1 spaces work {3dc, ch1}.  finish off by ss in the top of the ch3 space you started with. 

Round 3 and following rounds:

                      To make corners in ch2 spaces:  {3dc, ch2, 3dc, ch1}
                      Working in ch1 spaces:  {3dc, ch1}

{Keep adding rounds until you are happy with the size of your blanket.  You can change colors whenever you want and however you want.  I just made sure that my accent color (the blue) was spaced evenly for some uniformity.}

Last round:         


NOTE:   If your plan to use my Esme-edge pattern for your blanket, make sure that you end your last round of dc’s and ch1's with a number of stitches that are divisible by 3.  (Each dc counts as one stitch and each ch1 space counts as one stitch. ) 

For example I ended my last round on a total of 672 stitches.  I counted the number of ch1 spaces which were 168, which meant that there are also 168 dc clusters with 3 dc's in each cluster.  You may use this formula for calculating the stitches at the end.

Mine:  (168x3)+168 = 672 
General:  (dc’s x 3) + ch1's = total # of stitches


{Esmes' Edge}

Special stitches:  Picot - ch4, ss in fourth ch from hook.  (Make sure to stick hook into the front loop of the fourth chain, otherwise your picot will bend backwards.)

Round 1:     (Starting on 3rd dc of any corner space) Ch 1, sc in each stitch around blanket (in multiples of 3), ss in beginning ch.  (I did this in blue)

Round 2:     Ch 5, dc in 3rd ch from hook (there should be 2 open ch's).  {Ch2, skip 2 ch, dc,}  Repeat all the way around, ss in 3rd ch of ch5 space.

Round 3:     {ch3, sc into ch loop, ch3, sc into ch loop, ch3, sc into ch loop, ch4 sc into ch loop} Reapeat all around, ss into first ch of beginning ch3 loop.

{If round 3 does not work out perfectly don't worry too much, it will work out in the end.  Just make sure to complete the sequence in {these brackets} ending on a ch4 loop}

Round 4:     {Ch3, sc into ch3 loop, ch3, sc into ch3 loop,.  Into ch 4 space work *5dc, ch2, 5dc*.  Sc into next ch3 loop.}  Repeat around edge.  Sc into 1st ch of ch3 loop.

Round 5:     {Ch3, sc into ch3 loop, ch 4.  Into ch2 space work *3dc, ch2, 3dc*.  Ch4, sc into next ch3 loop.  Ch3, sc into next ch3 loop.} Repeat around.  Ss into first ch of ch3 loop.

Round 6:     {Into ch4 space work *6dc,picot*.  Into ch2 space work *3dc, picot, 3dc, picot*.  Into ch 4 space work *6dc*.  Sc in next ch3 space}.  Repeat around ss into sc at the beginning.  Finish off.

There it is!  Wow, that was harder than I thought!  If you have any trouble, please don't hesitate to contact me :)  

Please send me photos of your finished products or post them on the facebook page 'Ons hekel' with a tag {Esmes' Edge}.  

Happy hooking
{L}


Friday, August 9, 2013

A cowl for my mom

I found this really fluffly thick wool at Rubys Haberdashery in Waverly, Pretoria.  I used a 6mm hook and 2 skeins to finish this cowl for my mom.  She has always detested the winter and believes that your neck and your ears need to be covered!  Take a look:


Took a inconspicuous 'selfie' ;)


Aaand a close up of the flowers :) I'm feeling the purple and grey!


{Cowl Pattern}

This pattern is very easy!  I unfortunately threw away the yarns information leaflet, but I'm making a yarn-stash run to rubys again soon and will post an update!

Here's what I did:

Round 1:               Ch 70, ss in first ch.

Round 2:               Ch4, {skip 1 ch, dc in next ch, ch1} repeat around.  Ss in 3rd ch space of beginning ch4.

Round 3:               Ch4, {dc in ch1 space, ch1} repeat around.  Ss in 3rd ch space of beginning ch4.

Round 4 and consecutive rounds:  Repeat round 3 as many times as you like.  With two skeins I got to 7 rounds.  Finish off and embellish with flowers of your choice.  Easy!

{L}

Thursday, August 8, 2013

'n Uiltjie of twee

Ek kon myself nie inhou nie!


Ek het 'n hele paar effekleur 'onesies' (enige voorstelle vir 'n mooi afrikaanse woord?) by Ackermans gekoop en beplan om hul te versier met 'n bietjie hekel apliek en mooi gehekelde randjies.

Omdat daar so bietjie van die wol oor is wat Eloise gekoop het vir  Esme se kombersie het ek besluit om sommer daarvan te gebruik om die res van haar ooievaars-tee-krismisboks mee vol te maak en te versier.

Hierdie is 'n foppie-houer-borsspeld wat Eloise op enige van Esme se kleertjies kan vasspeld.

Ek weet dis die tweede post vir vandag, maar ek is so in my noppies met hoe my uiltjies uitgekom het!  

As jy 'n gratis patrone soek, los asseblief vir my jou epos adres as kommentaar dan pos ek hom vir jou.  Jy kan my ook volg op Bloglovin, sodat jy eposse kan kry as ek iets nuuts post of gragtis-grypies (free giveaways) weggee.

(If you would like one of the free patterns, follow me on bloglovin or leave your email address in the comments below and I will email it to you.  If I have enough requests, I will post a photo tutorial)

LET OP:  Die patrone mag nie gebruik word vir herverkoop nie.  
NOTE:  The patterns may not be used for resale.

Esmes' Granny Square baby blanket - finished!

The blanket is finished!  I love it!  My friends baby shower is in September. I plan to still customize a few onesies and maybe crochet a matching owl beanie :) watch this space!

{FREE PATTERN CAN BE FOUND HERE}


I only photographed 2 butterflies but I made about 30!  I put brooch pins on the backs of the butterflies so that Eloise can pin them anywhere on the blanket.  She could also use them on onesies, hats, mittens, shoes.  The pattern for the butterflies can be found here at {little birdie secrets} such a lovely and easy pattern!

{L}